Reference types
The Reference Types page defines the kinds of references (external data sources) that users can link to their plans and assets.
What are reference types
A reference type defines a category of external information that users can link to their plans and assets. Its entries can come from:
- Fixed lists: entries typed in by an administrator and stored within OpenCDMP
- Search APIs: entries looked up live from an external API as the user types
A reference type can combine several sources, and users can still add an entry by hand when they cannot find it. API sources support authentication, search rules, and field mappings for JSON and XML replies; see Connecting to an external API.
Why use reference types
Reference types improve data quality and interoperability. With them, plans:
- Link to authoritative sources, such as grant, organization, and publication databases.
- Carry information checked against trusted external sources.
- Point to searchable identifiers such as DOIs, ORCID iDs, and ROR IDs.
- Meet funder requirements to link to specific registries.
- Provide structured data for reporting.
Common reference types
Typical reference types include:
- Grants: funding awards from databases such as OpenAIRE, or from institutional systems
- Organizations: research institutions from ROR (Research Organization Registry)
- Researchers: author profiles from ORCID
- Publications: academic papers from Crossref or institutional repositories
- Datasets: research data from repositories such as Zenodo or Dataverse
- Taxonomies: controlled vocabularies and classification systems
Managing reference types
The Reference Types page is in the Data Sources group of the administration menu. It lists every reference type available in your organisation.
The listing shows the Name of each reference type with its code underneath, and the Created and Updated timestamps. At the top right corner of the listing you can also select which columns to display.
You can add a new reference type by clicking the Create Reference Type button at the top right corner of the page. The three dots on the last column of each row offer Edit, Entries (opens the editor on its Entries tab), and Delete. System Administrators also see an All entries button that lists the entries of every reference type.
This listing is organisation-scoped and supports the standard admin listing controls: scope tabs, search, Show deleted, column picker, and density. This page has no filters beyond those shared controls.
Authorization
Open to the System Administrator and Organisation Admin roles. Adding, editing, and deleting individual entries on the Entries tab is limited to the System Administrator role. See Roles.
The reference type editor
Opening or creating a reference type shows the reference type editor. Its header shows the name of the type, its code, and how many fields and sources it has. The header actions are:
- Close: Returns to the listing.
- Save: Saves the reference type. A note next to the buttons says whether there are unsaved changes.
- More actions (three dots):
- Test all sources: Opens a dialog where you search all the sources together, as users do, and see the mapped values of the result you select. Shown once the type has a source.
- Export XML: Downloads the reference type's definition as an XML file, which can be used as a backup or shared with another environment.
- Import XML: Loads a previously exported XML file into the editor, replacing the type's fields and sources with the ones in the file.
- Delete: Removes the reference type. Only available when editing an existing reference type.
Importing a file only updates the editor in your browser. The snackbar reads Definition imported. Review the changes and save to keep them. Nothing is sent to the server until you press Save, so you can close the editor without saving to discard an import.
Import and Export cover the reference type's definition: its fields, its sources, and the manual entry name. The Name and Code are not included and must still be set in the editor.
The editor is organised in four tabs: Fields, Sources, Manual entries, and Entries (shown once the reference type is saved).
Fields tab
About this reference type
- Name: The display name of this reference type, shown to users in selection lists and throughout the interface, for example
Researcher,Grant, orOrganization. - Code: A short, unique identifier, for example
researcher,grant, ororganization. It is used in blueprints, templates, and exports when configuring fields of the Reference Types type.
Once a reference type is actively used in blueprints or templates, changing its Code may break existing configurations that reference it.
Fields
Fields define the additional metadata that an entry of this type carries, beyond its basic identity. Each source maps its reply onto these fields, and users fill them in when they add an entry by hand.
For example, a Researcher reference type might define fields like first_name, last_name, and orcid_id, while a Grant reference type might define grant_number, funder, and start_date.
The first row of the table lists the three built-in fields every entry has: Reference ID (reference_id), Name (label), and Description (description). Click Add field to add a row of your own, with the following controls:
- Label: The human-readable name of the field, shown to users, for example
First NameorORCID Identifier. - Code: A machine-readable identifier, unique within the reference type, for example
first_nameororcid_id. It is used in the source mappings and in the manual entry name. - Data Type:
TextorDate. - Required: When on, users must fill in this field when they add an entry by hand. It does not affect entries retrieved from a source.
- Mapped in: How many of the type's sources fill this field, for example
1 of 2.
Expand a row to set its details:
- Help text shown to users: An optional explanation shown under the field when users add an entry by hand.
- Semantics: Optional semantic tags that classify the meaning of the field for interoperability. Pick suggestions, or type your own and press Enter. See Semantics.
- Remove field: Deletes the field.
Adding, renaming, or removing a field updates every source's mappings straight away: a renamed field keeps its mapping, and a removed field loses it.
When an API source does not map one of your fields, a Needs attention panel lists it, for example ORCID iD isn't mapped in ORCID Public API, so entries found there leave it empty.
Example: Researcher reference type fields
| Label | Code | Data Type | Required |
|---|---|---|---|
| First Name | first_name | Text | Yes |
| Last Name | last_name | Text | Yes |
| ORCID Identifier | orcid_id | Text | No |
Sources tab
A source defines where and how the entries are retrieved. Every reference type needs at least one source before it can be saved. When a type has several sources, users search all of them at once: Results from all sources are merged and sorted by name.
The tab lists the sources on the left, each marked as a Search API or a Fixed list with its key. Select one to configure it on the right.
Adding a source
Click Add source to open the Add a source dialog and choose one of:
- Search an API: Look entries up live as the user types, for example in ORCID, ROR, or OpenAIRE.
- Fixed list: Type in the entries yourself. Good for short lists that rarely change.
- Import a definition: Start from an XML definition exported from another reference type. This replaces the type's fields and sources with the ones in the file.
For a new source, enter:
- Shown to users as: The source name shown on entries and in the source list, for example
ORCID Public API. - Key: A short identifier of the source, suggested from the name, for example
orcid-public-api. It must be unique within the reference type and is stored with every entry from this source, so do not change it once entries exist. - URL: Search an API only. The address to call. You can also fill it in later.
The source name and key stay editable at the top of the source panel, and the panel's menu offers Remove source.
Each source is set up in steps, shown as numbered buttons:
| Source | Steps |
|---|---|
| Search API | Request, Search rules, Test and map, Display |
| Fixed list | Entries, Display |
Request, search rules, and test and map (API sources)
An API source is set up like every external API call in OpenCDMP, as described in Connecting to an external API:
- Request: The method, the URL with its placeholders, the first page number, and, for
POST, the body. The headers and the authentication are set here too, per source. See Request. - Search rules: Who filters the results, and what replaces each placeholder, such as
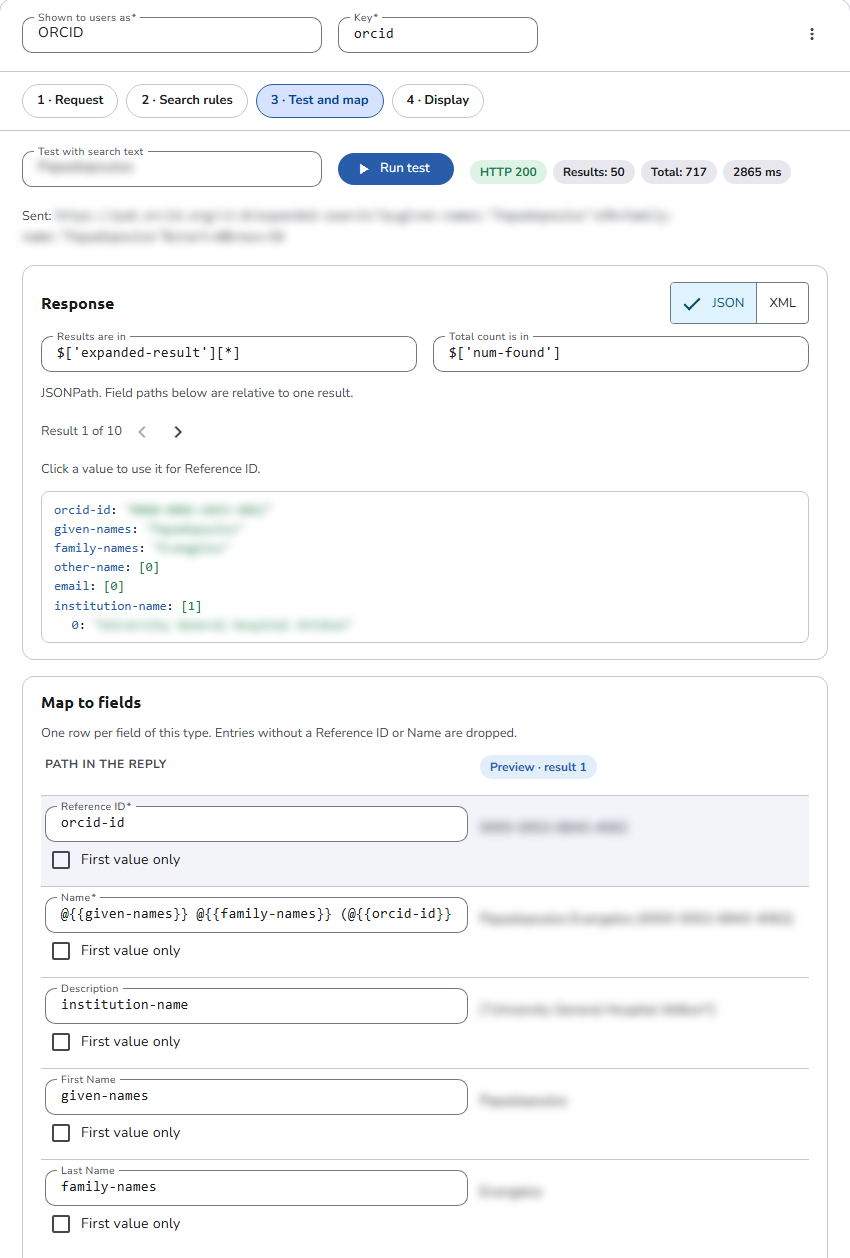
{like}. A rule can also use an entry picked in a field of another reference type (Depends on). See Search rules. - Test and map: Run a test search, set where the results are in the reply, and map one result to the fields of the type in Map to fields: the built-in Reference ID, Name, and Description, and your own fields. Under the rows, a card previews the result as users will see it. See Test and map and Path syntax.
Entries (fixed lists)
A fixed list stores its entries inside OpenCDMP; no external connection is made. This suits controlled vocabularies and short, stable lists such as license types, access modes, or document statuses.
The entries are a table with one row per entry and one column per field: Reference ID, Name, Description, and the type's own fields. Every cell needs a value. Click Add entry to add a row. A search matches the Reference ID, Name, or Description.
Display
These optional settings control how entries from this source are presented to users, which helps them recognize where an entry comes from when several sources feed the same reference type.
- Logo: An image shown on entries from this source.
- Link to the entry: A Link URL that makes the entry's ID a link to the source's own site, for example
https://orcid.org/{reference_id}. The Insert buttons add the codes of the type's fields. After a test, the editor shows the link for the test result. - Tooltip: Text shown when users hover over the source name on an entry. Enter plain text, or a translation key so that it shows in each user's language; the editor then shows the translation in the current language.
Manual entries tab
When a user cannot find an entry and adds one by hand, the Entry name setting decides how it is named:
- Users type a name: The add dialog asks for a name.
- Build it from fields: The name is built from the entry's fields with a Name pattern such as
{first_name} {last_name}. The Insert buttons add field codes, and an Example shows the pattern with field labels. Fields used in the pattern become required in the form. This option needs at least one field on the Fields tab.
See Adding a reference manually for the user's side.
Entries tab
Once a reference type is saved, the Entries tab lists the values people have picked in plans and assets. Entries fetched from a source follow that source; only entries people added can be edited.
- Search by name filters the list.
- From shows
Any source,Fetched from a source, orAdded by people. - Used only keeps the entries used in at least one plan or asset. Plans and assets of superseded plan versions do not count.
- The table shows each entry's Name and identifier, where it is From, where it is Used in (for example
Plans: 2 · Assets: 5, orNot used), and when it was Updated.
Click an entry to see its details. System Administrators can also:
- Edit an entry added by people.
Changes apply to every plan and asset that uses this entry.When the type has a name pattern, the name is rebuilt from the fields. - Delete entry.
Deleting an entry also removes it from the plans and assets that use it. - Add entry opens the reference editor to add an entry directly.
Validation when saving
When you press Save, the editor checks the reference type before sending it:
- The Name and Code, and the label and code of every field, are required.
- The type needs at least one source.
- Each source needs a name and a key, and every cell of a fixed list needs a value.
The Fields and Sources tabs are marked when they have problems, sources with problems are flagged in the source list, and the editor switches to the tab that needs attention. Errors returned by the server are shown on the matching control.
Examples
Reference type recipes walks through three complete configurations: ORCID researchers from a JSON API, re3data repositories from an XML API, and a fixed list of licenses.