Create or edit a plan
Create a plan
To create a new plan in OpenCDMP you can either import an existing plan from a file or fill in a plan from the start. Click New Plan, under My Plans in the My Workspace section of the side navigation menu, to begin.
 New plan
Creating a plan is a two-step flow shown on a full page: Select Blueprint, then Create Plan. A hint under the steps explains that blueprints set out the structure your plan will follow, and Back to Dashboard leaves the flow.
In the first step, a panel on the left answers How would you like to get started?. At the top, the Import Plan card (with the hint Upload an existing plan file) lets you upload an existing plan file instead of starting from a blueprint. Below it, under or start fresh, a search box and the available Blueprints (which describe the plan's structure) are listed, grouped by blueprint type. The default plan blueprint (the Blueprint for new plans under Settings > Content defaults; see Organisation settings) is offered by default. Selecting a blueprint opens a live preview on the right with its sections and the questions each contains. In the preview you can expand or collapse all sections and download it as a PDF. Sections that carry pre-selected asset templates are marked with an Asset Template tag; you can replace those templates with any available template when you create the plan. Press Proceed with this blueprint to open the editor.
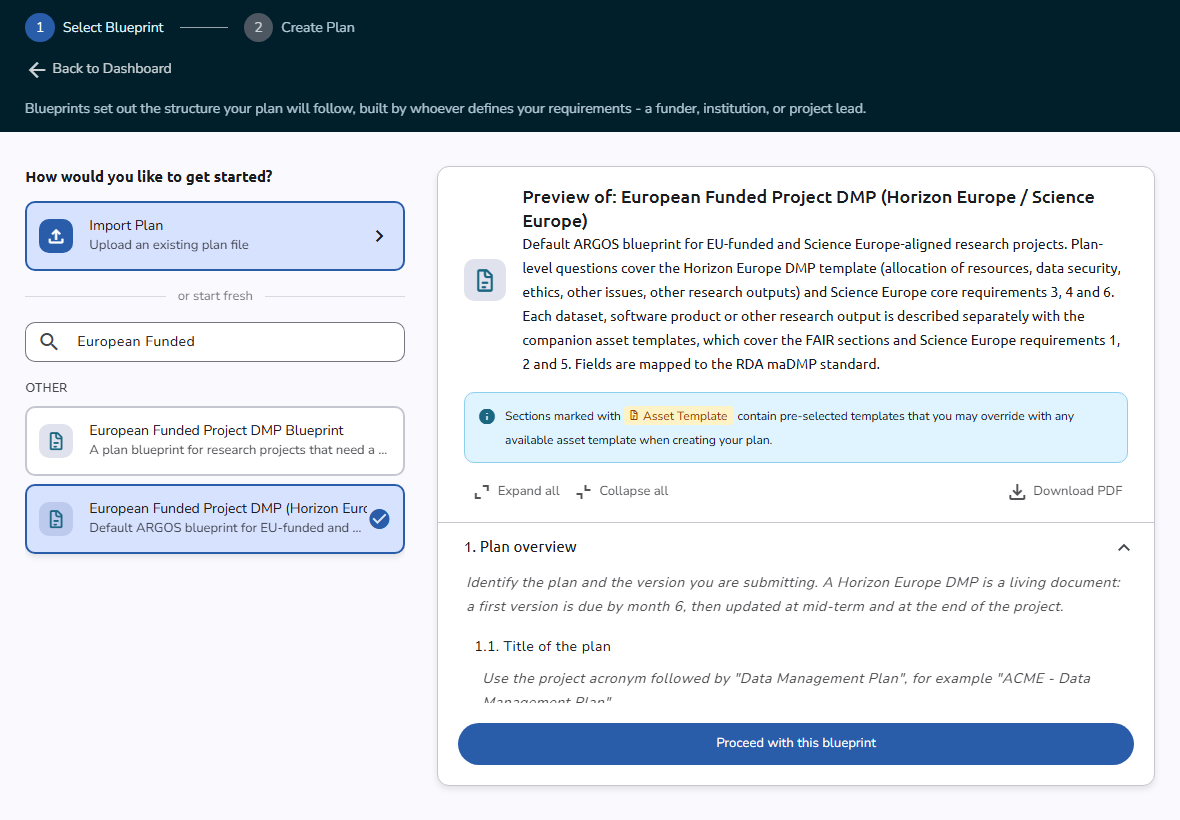 Select Blueprint step
Plan creation consent
If the selected blueprint requires Creation Consent (set by an administrator on the blueprint), a consent message and a checkbox are displayed alongside the blueprint. The message states the consent, and any additional details appear beneath it. The Proceed with this blueprint button remains disabled until you check the box to accept the consent.
If you switch to a different blueprint, the consent checkbox is reset and you must accept the consent again for the newly selected blueprint.
The same consent step applies when you duplicate a plan, start a new version of it, or import it, and its blueprint asks for consent: the plan is created, but you must accept the consent before you can edit it.
The full plan editor opens with all the sections of the selected blueprint. After the first save, the plan:
- has the starting status of your organisation's workflow (see Change status and finalize a plan)
- has version 1 (see Versions)
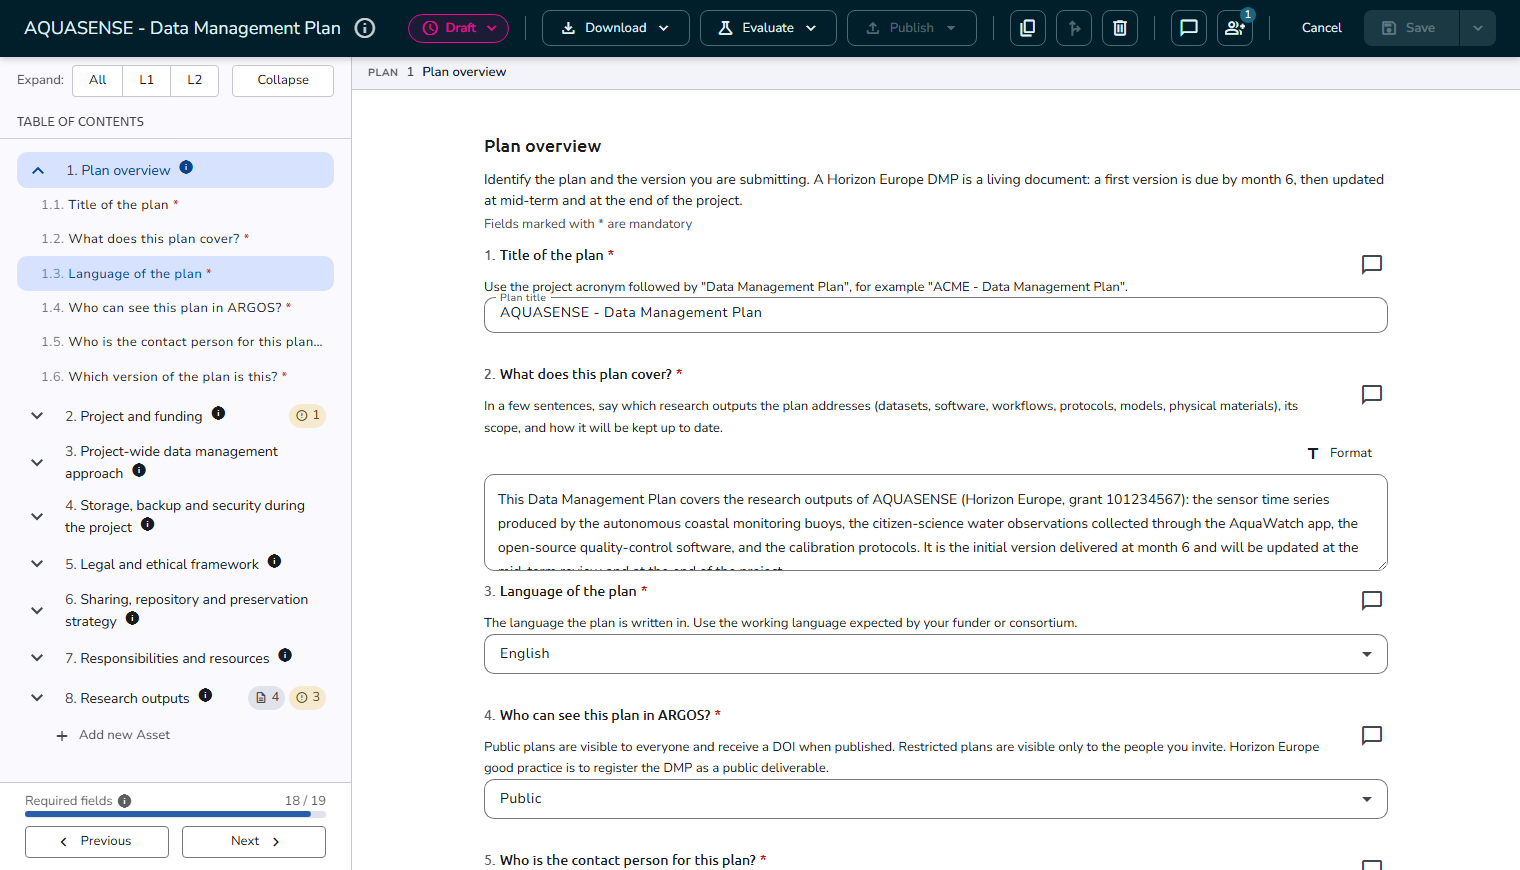 Plan editor
The plan editor
The plan editor is where you fill in the plan and its assets. It presents the plan content in the center, a table of contents for navigation on the left, and a single-row toolbar of actions across the top.
A short guided tour introduces the editor the first time you open it.
The toolbar
The toolbar starts with the plan title and an info button (Show more plan information) that reveals the blueprint, version, creation date, and last modification date. Next to the title, a chip reads unsaved changes whenever something in the plan or its assets has not been saved yet. When the toolbar is crowded, for example on a laptop screen, the chip shrinks to a dot; hover it to see the label. A Previewing Plan chip appears when you open a plan you cannot edit (read-only access).
When other users have the plan open at the same time, their avatars appear at the start of the controls; hover an avatar to see who it is, and click it to jump to the part of the plan that user is working on.
The remaining toolbar controls are, from left to right:
| Control | Description |
|---|---|
| Status | A pill outlined in the color configured for the current status. Click it to open the Change plan status menu, which lists every status you can move the plan to, each with its icon, label, and description. See Change status and finalize a plan. |
| Download | Opens a menu with the available export formats (for example PDF, Document, RDA JSON, RAiD JSON, XML). Disabled while there are unsaved changes (Save your changes first) or when the current status does not allow exports. See Download a plan or asset. |
| Evaluate | Opens a menu with the configured evaluators. Shown only when evaluators are available. Disabled when the current status does not allow evaluation (You cannot evaluate in this plan status state). See Evaluate a plan or asset. |
| Publish | Opens the Publish to menu with the available repositories, and lists the repositories the plan is Already published to. Disabled until the current status allows publishing, which usually means the plan is finalized (Finalise this plan first to publish it.). No longer shown once the plan is published to every repository. See Publish a plan. |
| Duplicate plan | Icon button that creates a copy of the plan. |
| Start a new version | Icon button that creates a new version. Available only on the current version of a finalized plan (Finalise this plan first to start a new version.). See Versions. |
| Delete | Icon button that deletes the plan after confirmation. |
| Comments | Toggles the comments panel, which docks beside the content so you can read a field while discussing it. The badge shows the number of comments. See Comments and review. |
| Collaborators | Opens the collaborators panel as an overlay side sheet, where you invite and manage users. The badge shows the number of collaborators. |
| Cancel | Leaves the editor. When there are unsaved changes, it discards them after you confirm the prompt All unsaved changes will be lost. Would you like to proceed? with Yes, revert changes. |
| Save | Saves and keeps you in the editor. The arrow next to it opens a menu with Save & Close and Save & Continue (see Saving your work). |
Controls you are not permitted to use are hidden; controls that are unavailable in the current plan status or while changes are unsaved are disabled and explain why in a tooltip.
To change the plan status you must save or discard all editor changes first. While there are unsaved changes, the status options are disabled with the tooltip Save your changes first, and clicking one shows Save your changes before changing the plan status. If you have added assets that have not yet been saved, the message reads Save the plan to persist the new assets before changing the plan status.
Saving your work
The Save control tracks all unsaved changes across the whole plan: the plan fields, every asset, and any newly added assets. Save becomes enabled as soon as something changes. When anything is unsaved:
- The toolbar shows the unsaved changes chip (or a dot, when the toolbar is crowded) next to the plan title.
- The table of contents marks each section and asset that has unsaved changes with a small dot.
Click Save to save and keep working in the editor. The arrow next to Save opens a menu with two options:
- Save & Close: saves and leaves the editor. This option also works while you are editing an asset inside the plan.
- Save & Continue: saves and keeps you in the editor, the same as Save.
The plan and all its edited assets are saved together: either everything is saved or nothing is.
Required fields
Required questions are marked with an asterisk (*) on their heading, and every top-level section that contains required fields shows the legend Fields marked with * are mandatory under its title. The table of contents mirrors this:
- Field rows carry the same asterisk as the form.
- A Required fields progress indicator counts the completed required fields.
- Sections and assets that still have required fields to complete show an amber counter. Hover it to see which fields or assets are pending (for example, 12 still to complete: Horizon Europe (12)).
To finalize a plan, you must fill in all required fields. See Fill in a plan for the kinds of question you can meet.
Navigating with the table of contents
The Table of contents lets you move through the plan and its assets. Sections and assets are shown with numbering (for example, 1., 1.1.) that matches the plan structure. Each asset also shows its status, any unsaved-changes dot, a lock indicator, the amber pending counter, and a comment count.
- Use the Expand controls (All, L1, L2, Collapse) to expand or collapse the outline to a given level.
- Use the Previous and Next buttons at the bottom of the table of contents to step through the plan one entry at a time.
Editing plan content and assets
In the editor you answer the plan questions and add assets to any section that accepts asset templates. Each such section shows a Linked Assets panel listing its existing assets, with Add new Asset to create another and Manage templates to choose which templates the section offers.
The Add new Asset button is also always available in the table of contents, directly under each section that accepts assets, whether the section is collapsed or expanded. Both buttons behave the same way: they are disabled, with an explanatory tooltip, when the section has reached the maximum number of assets allowed for its templates or when you have changed the section's templates but not yet saved the plan (Save plan changes to enable adding assets).
Clicking Add new Asset opens the Add a new asset wizard inside the editor. The wizard first asks How would you like to fill in this asset? (Fill in myself, Import from a published resource, or Copy from an existing asset), then lets you choose a template and name the asset before the asset form opens. See Create or edit an asset for the full asset creation and template management flow.
When an asset is open, a context band above the form names the asset, its number in the plan, and its status. The status of the active asset can be changed from this band. As with the plan status, you must save or revert the asset's unsaved changes first. Use Revert to discard the unsaved changes of a single asset without leaving the editor.
Working with references in a plan
When editing a plan, some fields require selecting values from predefined lists instead of typing free text.
These lists are called References.
If the value you need is not in the available options, you can add it manually. See Adding a reference manually.
Updating an asset to a new template version
When a newer version of an asset template used in your plan becomes available, OpenCDMP prompts you to update the affected asset. A dialog titled New Version available for the asset asks: Would you like to update to the new version? Choose Update to start the update, or Cancel to keep the current version for now.
Next steps
- Fill in a plan: the kinds of question and how to answer them
- Create or edit an asset: add and manage the assets linked to your plan's sections
- Plan overview: view all plan details and take actions such as download, publish, and evaluation
- Versions: create a new version and compare two versions of a plan
- Work together: share your plan and assign sections to team members
- Download a plan or asset: download your plan as PDF, DOCX, JSON, or XML