Publish a plan
Publishing a plan deposits it in an external repository (such as Zenodo or Dataverse) and assigns it a DOI (Digital Object Identifier). The DOI provides a permanent, citable link to your plan. Publishing is separate from making the plan public on Public Plans; see Who can see your plan.
- Publish is available both on the Plan overview page and in the plan editor toolbar.
- Publishing is available only when the current plan status permits it, which usually means the plan is finalized. Until then, the button in the editor toolbar is disabled with the tooltip Finalise this plan first to publish it., and the Plan overview page does not show the button; instead, the About box reads You need to finalise the plan before publishing it. under PID. See Plan & asset workflows.
- Only plan collaborators with the Owner role can publish a plan (as can users with the System Administrator or Organisation Admin role).
- The repositories you can publish to, and the accounts you can publish under, depend on the Deposit Services your installation provides and on your organisation's settings.
Step 1: open the Publish menu
Click Publish at the top right of the Plan overview page, or in the plan editor toolbar. The menu has two parts:
- Publish to: the repositories you can publish this plan to, each with its name, its logo, and the address of its records. The address tells two connections to the same kind of repository apart.
- Already published: the repositories that already hold a record of this version of the plan. Each entry reads Published · open the record and opens the record in a new tab.
A repository moves from Publish to to Already published once the plan is published there. When the plan is published to every repository, the Publish button is no longer shown.
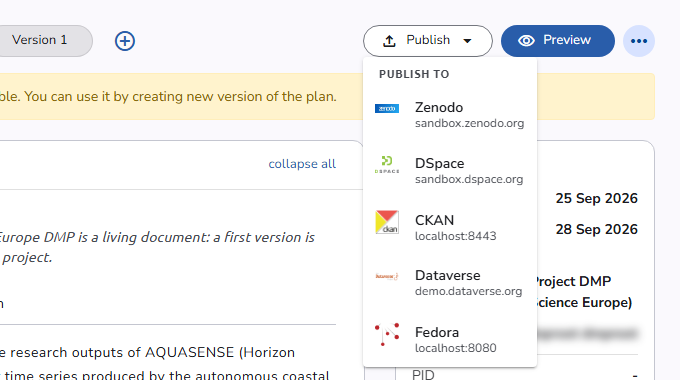 Publish menu
Step 2: choose the account
Click a repository under Publish to. The Publish to [repository] dialog opens, with three steps shown at the top: Account, Review, and Published.
The Account step asks under which account the record is published (Publish as):
| Choice | What it means |
|---|---|
| The organisation's [repository] account (or the account name your organisation set), tagged Organisation | The record is published under the organisation's account. You will not be able to edit or manage it in the repository yourself. |
| My own [repository] account | You own the record and can edit it in the repository later. |
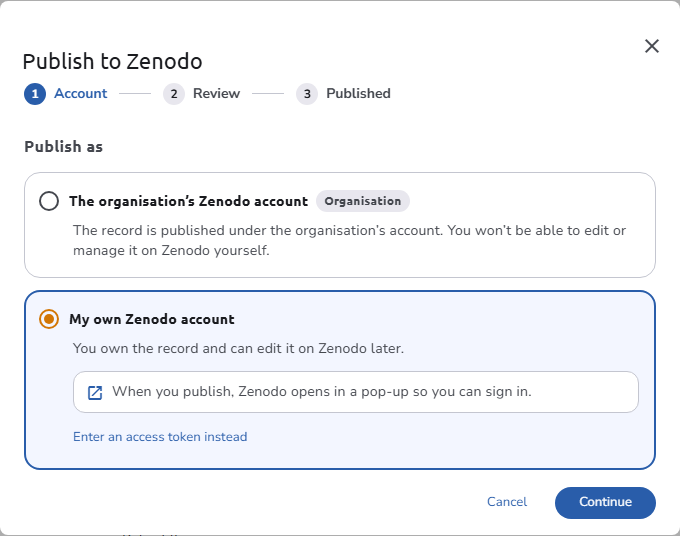 Account step
Your organisation decides which of the two you may use, and which one is selected when you open the dialog. If you have saved credentials for the repository in your profile, your own account is selected and tagged Connected.
When only the organisation's account is allowed, the step shows no choice, only a note such as Published under the organisation's [repository] account. When no way is set up, the dialog shows There is no way set up to publish to [repository]. Contact your administrator.
Publishing under your own account
Depending on what the repository supports, your own account is used in one of these ways. Links under the choice switch between them:
- Saved credentials: Uses the credentials saved in your profile. Switch to it with Use the credentials saved in your profile.
- Sign in: When you publish, [repository] opens in a pop-up so you can sign in. Switch to it with Sign in to [repository] instead.
- Credentials typed in the dialog: fill in the fields the repository asks for, such as an access token. Each field has a button to show or hide its value. Keep Save to my profile for next time ticked to store them in your profile once the plan is published. Switch to it with Enter an access token instead, or Use different credentials when you already have saved ones.
Click Continue to go to the review.
Choosing your own account never falls back to the organisation's account. If your credentials are missing or the repository refuses them, nothing is published.
Step 3: review what will be published
The Review step starts with the account the record is published under, for example Publishing under your own [repository] account, and a Change button that returns to the account step.
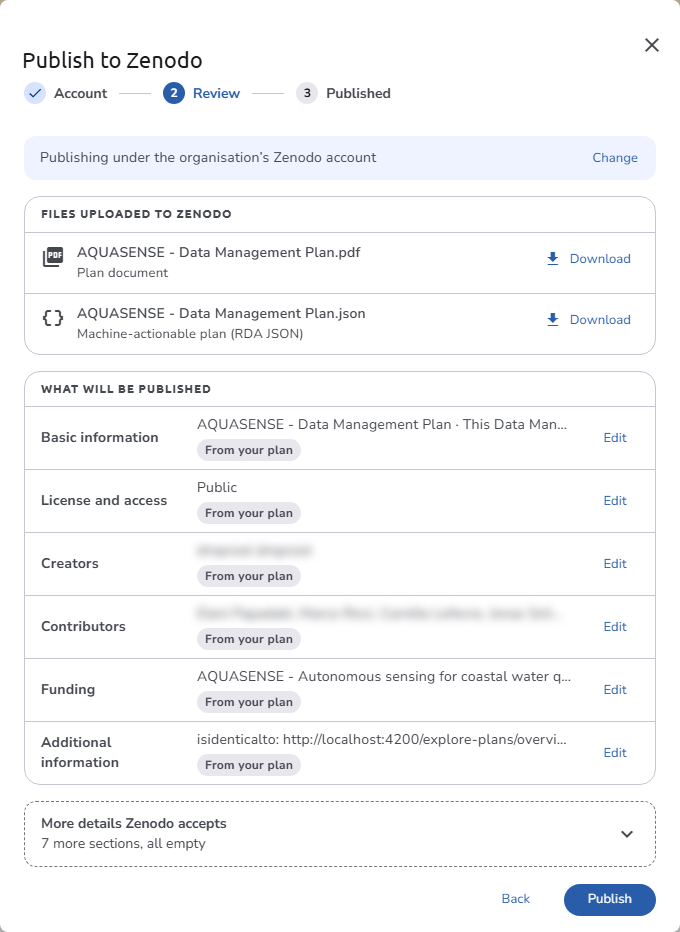 Review step
Files
Files uploaded to [repository] lists the files that go with the record:
| File | Content |
|---|---|
| Plan document | The plan as a PDF file, named after the plan |
| Machine-actionable plan (RDA JSON) | The plan in the RDA maDMP JSON format |
| Supporting files | A ZIP archive of the files uploaded in the plan and its assets. Expand [count] files inside to see them. Listed only when the plan has uploaded files. |
Only the files the repository accepts and your organisation chose to deposit are listed. Click Download next to a file to check it before publishing.
Metadata
Some repositories (Zenodo, CKAN, Dataverse, and Fedora) let you review and edit the metadata of the record before it is submitted. For these, What will be published lists one row per section of the repository's form (for example Basic information, License and access, Creators, Contributors, Funding, Additional information), each with a summary of its value and a tag that says where the value comes from:
| Tag | Meaning |
|---|---|
| From your plan | Mapped from the plan's answers through its blueprint and templates |
| Changed by you | You changed the value, now or when you last published this plan to the same repository |
| Added automatically | Set by the system or by your organisation; it cannot be changed here |
| Required | The repository needs a value that is missing |
- Click Edit on a row to change its values, and Done to close it.
- In repeatable sections (such as Creators, Contributors, and Funding), Add creates an entry and the delete button removes one. An empty section reads No entries. Use Add to create one.
- Some fields (such as license and language) search the repository's own list as you type.
- Long text fields use the rich text editor.
- Sections that are empty and optional are collected under More details [repository] accepts ([count] more sections, all empty). Click a section there to add it to the review.
When something required is missing, a message at the top reads, for example, 1 thing to complete before publishing, with a Complete [section] button for each section that needs attention. Publish stays disabled until every required value is filled in.
Edits you confirm are remembered for this plan and repository, and are shown as your starting point the next time you publish the plan to the same repository. A restored value carries a restore icon (Restored from your previous deposit of this plan.). If the plan's own value for a field has changed since, the newer plan value is shown instead, and a history icon shows the value you entered before.
Your organisation can hide sections of the review, or lock values so that they are shown read-only. Values your plans map into a hidden section are still published.
For repositories without a review step, the dialog shows [repository] doesn't offer a review, so your plan is published as mapped from its blueprint.
Publish
Click Publish to submit the record, or Back to return to the account step. When you publish under your own account by signing in, the button reads Sign in and publish: the repository opens in a pop-up, and the plan is published once you sign in. If you close the pop-up before signing in, the dialog shows The sign-in window was closed before you signed in. Nothing was published.
Step 4: published
When the repository accepts the record, the dialog shows Published to [repository], under which account, and the assigned DOI with a button to copy it. Click Open on [repository] to view the record in a new tab, or Done to close the dialog.
After a successful publication:
- The DOI appears in the PID field of the About box on the Plan overview page, alongside the repository name.
- The repository is listed under Already published in the Publish menu.
- All other collaborators on the plan receive a notification that the plan was published.
If publishing fails
If the repository does not publish the plan, the dialog says why, for example [repository] didn't publish the plan, [repository] didn't accept the sign-in, or Your [repository] credentials are missing, and confirms that Nothing was published, and your plan is unchanged. Expand Details to see the repository's message. From there you can:
- Try again.
- Go Back to the review, with your edits kept.
- Use the organisation's account, when you tried your own account and the organisation's account is allowed.
- Cancel to close the dialog.
If the review cannot be loaded after you click Continue, the dialog shows Couldn't load the review: [repository] didn't return the details to review. Nothing was published. Try again, or go back and choose another account. Expand Details for the repository's message, then click Try again, Back to return to the account step, or Cancel.
See Troubleshooting: publishing fails for common causes and solutions.
Publish a new version
Each version of a plan is published separately. When you publish a new version of a plan whose earlier version was published, the deposit service adds a new version to the existing repository record. The previous DOI remains valid and points to the earlier version.
View and use the DOI
After a successful publication, the DOI is displayed in the About box on the Plan overview page. You can:
- Click the DOI to open the repository record in a new tab.
- Publish the same plan to other repositories to receive more DOIs.
See also
- Deposit Services: the available repositories and the settings organisations can adjust
- Organisation settings: repositories: who publishes, which files are deposited, and what users can change in the review
- Profile: repository accounts: save your own repository credentials
- Plan overview: where the Publish button is located
- Change status and finalize a plan: finalize the plan before you publish it
- Who can see your plan: how publishing differs from a public plan
- Troubleshooting: publishing fails: diagnose common publishing errors